For anyone wanting to trim or cut their own bangs without the salon price tag. These practical, step-by-step tips are based on professional hairstyling techniques. Last updated recently to reflect current best practices.
I’ll never forget the first time I cut my own bangs. It was a Friday night, I had a big event the next day, and my bangs had grown past my eyebrows. The salon was closed, and I thought to myself: “How hard could it be?”
Spoiler alert: I cut them way too short. Like, awkwardly-short-for-three-months short. I spent the next few weeks pinning them back and regretting my impulsive scissor work.
But here’s the thing—cutting your own bangs doesn’t have to be a disaster. With the right tools, techniques, and a bit of patience, you can absolutely trim your bangs at home and get salon-quality results. Thousands of people do it successfully every single day.
The key is understanding what professional stylists know: it’s not just about chopping across your forehead. There’s technique involved—from sectioning properly to understanding hair texture, cutting angles, and working with your natural growth patterns.
In this guide, I’m going to walk you through everything you need to know to cut your own bangs like a pro. Whether you’re maintaining existing bangs or cutting them for the first time, these tips will help you avoid common mistakes and get the look you want.
1. Invest in Proper Hair-Cutting Scissors
Let’s start with the most important tool: your scissors. This is where a lot of DIY bang disasters begin—people grab whatever scissors they can find in their junk drawer. Kitchen shears, craft scissors, even those tiny nail scissors.
Here’s why that’s a problem: regular scissors aren’t sharp enough for clean cuts on hair. They crush and tear the hair shaft instead of slicing through it cleanly. This creates uneven, jagged ends that look messy and can lead to split ends and breakage.
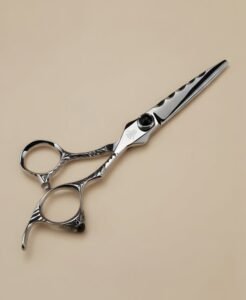
Professional hair-cutting scissors have ultra-sharp beveled blades specifically designed to slice through hair smoothly. They give you precise control and create clean lines that make your bangs look polished instead of hacked.
How to Choose the Right Scissors
You don’t need to spend $200 on professional shears, but do invest in a decent pair meant for hair cutting. Look for:
- Stainless steel blades that are at least 5-6 inches long
- A comfortable grip that fits your hand
- Sharp, aligned blades (test them on a single hair strand—they should cut cleanly with minimal pressure)
2. Always Start with Dry Hair
This might be the most important rule for cutting your own bangs: always cut them dry.
When hair is wet, it stretches and appears longer than it actually is. Depending on your hair type, wet hair can stretch 30-50% longer than its dry length. This means if you cut your bangs wet, they’ll shrink up dramatically when they dry—leaving you with bangs that are much shorter than you intended.
I learned this the hard way during my first bang-cutting disaster. I thought cutting them wet would make it easier (like they do in salons, right?). But professional stylists know exactly how much length to account for. We don’t.
The Right Way to Prep Your Bangs
- Wash and completely dry your hair first
- Style your bangs the way you normally would (blow-dry them forward, use a round brush, whatever your routine is)
- Make sure they’re sitting naturally on your forehead before you cut
This way, you’ll see exactly where they fall and can trim accordingly. What you see is what you’ll get.
3. Section Your Bangs Correctly
One of the biggest mistakes people make is cutting too much hair as “bangs.” This creates a heavy, blocky look and can accidentally turn your whole front section into bangs when you only wanted a small fringe.
Professional stylists use very specific sectioning to isolate just the hair that will become bangs. Getting this right makes the difference between bangs that look intentional and bangs that look like an accident.
How to Section Like a Pro
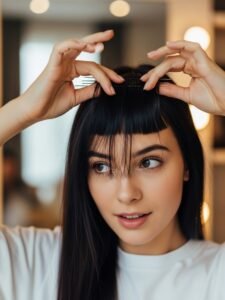
- Find your starting point: Place your comb or finger at the highest point of your eyebrow arch. Move straight back toward your crown. This is your side boundary.
- Create a triangle: From that point, create an imaginary triangle that comes to a point about 1-2 inches back from your hairline. This triangle of hair is your bang section.
- Clip everything else back: Use clips to secure all other hair completely out of the way. You want ZERO chance of accidentally cutting hair that shouldn’t be part of your bangs.
- Double-check your section: The bang section should be relatively small—much smaller than most people think.
4. Use the Point-Cutting Technique
Here’s a technique that separates amateur cuts from professional-looking results: point cutting (also called point trimming).
Instead of holding your scissors horizontally and cutting straight across (which creates a blunt, harsh line), you hold your scissors vertically and make small snips into the ends of your hair. This creates soft, textured edges that blend naturally and look less “DIY.”
How to Point Cut
- Hold a small section of your bangs between your fingers
- Turn your scissors so the blades are pointing up (vertically) instead of across (horizontally)
- Gently snip into the ends of your hair, cutting just a tiny bit at a time
- The scissors should point upward into your hair at about a 45-degree angle
- Make small, controlled snips—don’t close the scissors all the way
Why this works: Point cutting removes weight and creates texture without a harsh line. It mimics the way hair naturally falls and prevents that “I clearly just cut my own bangs” look. The result is softer, more professional-looking bangs with movement and dimension.
5. Cut in Natural Light
Lighting matters more than you might think. Bad lighting can make you miss uneven sections, cut more than you intended, or misjudge where your bangs actually fall.
Bathroom lighting, especially those warm overhead bulbs, can be deceptive. They create shadows that hide mistakes until you step outside or into different lighting.
Best Lighting Setup
- Natural daylight is ideal: Set up near a window during daytime
- Use a well-lit mirror: If you’re cutting at night, use bright, white light that mimics daylight
- Check from multiple angles: Move around and look at your bangs from different lighting conditions before you finish
Good lighting helps you see the true length, catch any uneven spots, and evaluate your progress accurately as you cut.
6. Start Longer Than You Think You Need
This is the golden rule that will save you from bang regret: always start longer.
I recommend starting at least a quarter-inch longer than your target length—maybe even half an inch if this is your first time. Remember, you can always cut more, but you absolutely cannot add length back.
Think of it like seasoning food while cooking. You can always add more salt, but you can’t take it out. Same principle with bangs.
Finding the Right Length
For most face shapes, bangs look best when they hit somewhere between the middle of your eyebrows and just touching your eyelashes. But personal preference matters here.
- Start at eyebrow level or slightly below
- Cut a little, then check
- Let your bangs settle naturally on your forehead
- Make tiny adjustments as needed
7. Work in Small Sections
Trying to cut all your bangs at once is a recipe for disaster. Professional stylists work in small sections for a reason: it gives you control, precision, and helps ensure evenness.
The Section-by-Section Method
- Divide your bang section into 3-5 smaller vertical sections
- Start with the center section (this is your guide)
- Hold the hair between your index and middle finger, pulling it straight down or at a slight angle away from your face
- Cut the center section first, keeping it slightly longer than your goal
- Move to side sections, using your center as a guide for length
- Check and blend as you go
Working in small sections prevents you from accidentally cutting too much and helps you create a more even, graduated shape. Each section can be adjusted individually before you move on to the next.
8. Hold Scissors at an Angle, Not Straight Across
The angle at which you hold your scissors makes a huge difference in the final result. This goes hand-in-hand with the point-cutting technique I mentioned earlier.
Never cut bangs with your scissors perfectly horizontal. This creates a blunt, harsh line that looks choppy and unnatural—like you took a ruler and chopped across your forehead.

The Right Angle Technique
- Hold scissors at a slight diagonal angle (about 45 degrees)
- Point the tips slightly upward into your hair
- Make small snips rather than one big cut
- This creates a softer edge that blends better and looks more natural
Why angles matter: Hair doesn’t naturally grow in a perfectly straight line across your forehead. It has movement, texture, and variation. Cutting at an angle respects these natural characteristics and creates bangs that flow and move naturally rather than sitting stiff and rigid.
9. Account for Your Hair Texture
Not all hair is created equal, and different textures require different approaches when cutting bangs.
For Fine or Thin Hair
Fine hair shows every cut line more obviously, so precision matters even more. Use very small snips and err on the side of leaving length. Fine hair also tends to lie flatter, so you might want to cut bangs very slightly shorter than your target since they’ll have less volume and lift.
For Thick or Coarse Hair
Thick hair can handle a bit more aggressive point cutting to remove bulk and weight. You may need to do internal layering (cutting shorter pieces underneath) to prevent your bangs from looking too heavy. Consider texturizing the ends more to create movement.
For Curly or Wavy Hair
This is where the “cut when dry” rule becomes absolutely essential. Curly bangs should be cut curl by curl, following the natural curl pattern. Cut them significantly longer than you think—curls can shrink up dramatically, and you want your bangs to hit your eyebrows when stretched, not when in their natural curl state.
Many people with curly hair do better with longer, swoop side bangs rather than straight-across bangs because they work better with curl patterns.
10. Know When to Stop and Reassess
Here’s some wisdom that took me years to learn: the best time to stop cutting is probably sooner than you think.
It’s incredibly easy to get caught in a cycle of “just a little more… just evening this one side… just a tiny bit shorter…” and before you know it, your bangs are way too short.
The Stopping Point Strategy
- Set a limit before you start: Decide you’ll only make 2-3 passes with the scissors
- Take breaks: Step away for 5-10 minutes between cutting sessions
- Check in different lighting: Move to another room or outside to see how they really look
- Get a second opinion: Ask someone else to look before you cut more
- Wait 24 hours for major adjustments: If you think they need more trimming, sleep on it first
Remember: hair grows back. If you stop too soon and your bangs are a bit longer than ideal, you can trim them again in a few days. But if you cut too much, you’re stuck waiting weeks for them to grow out.
Conclusion: You CAN Cut Your Own Bangs Successfully
Cutting your own bangs doesn’t have to be scary or risky. With the right tools, proper technique, and a patient approach, you can absolutely maintain your bangs at home and save yourself time and money.
The key takeaways to remember:
- Use proper hair-cutting scissors
- Always cut when dry
- Start longer than your goal
- Work slowly in small sections
- Use point-cutting and angled techniques for softer edges
- Know when to stop
Your first time cutting your own bangs might feel nerve-wracking, but it gets easier with practice. Start conservative, make small adjustments, and be patient with yourself. Even if they’re not perfect the first time, they’ll grow and you’ll have another chance to practice.
And honestly? Even professional hairstylists occasionally cut their bangs a bit too short. It happens. Hair grows back. But with these techniques, you’re setting yourself up for success and avoiding the most common mistakes that lead to bang disasters.
Give yourself grace, take your time, and remember: bangs are supposed to be fun. Don’t stress too much about perfection—aim for “good enough” and enjoy the satisfaction of doing it yourself.
Want More Hair Care Tips?
If you enjoyed this guide and want more practical, science-backed hair tips delivered to your inbox, join the newsletter! You’ll get weekly guidance on everything from hair health to styling techniques—no spam, just helpful information you can actually use.
Ready to become your own hair expert? Let’s keep learning together.

Hi, I’m Andrew Trust. For me, beauty has always been more than appearances—it’s about confidence, self-expression, and feeling your best every single day.
Over the years, I’ve explored, experimented, and discovered what truly works in hair and beauty. Not just trends or picture-perfect looks, but real techniques and tips that fit into everyday life and actually make a difference.
My goal is simple: to help you find the styles, routines, and little beauty tricks that bring out your best self—effortlessly and authentically. Beauty should feel enjoyable, empowering, and truly yours—and that’s exactly what I’m here to help you achieve.